MTS2:Creator Guidelines/Sims/Sandbox
Contents |
TS2 Sims Guidelines
When uploading a sim for The Sims 2 to Mod The Sims, we have some basic requirements to ensure that your upload is good, shown well, and has the correct info and files needed for people to use it in their games.
Quality
Sims based on a person or character must be recognizable as who they are meant to be. Any other sim, not based on an existing person, must have a unique face sculpt, not resembling the default faces.
If you have made custom content for your sim, it must be of good quality too, and follow our [MTS2:Creator Guidelines/Body Shop|Body Shop Creator Guidelines].
No Pay Content
Do not use pay content on your sim.
Title & Description
You must write a text description for your upload, describing the person or sim, at least a couple sentences. If you are not a native English speaker, using Google Translate is okay!
Screenshots
Take some nice big pictures of your sim, in-game (not in Body Shop), indoors and in a well-lit room or in Create-a-Sim. You will need to include at least:
- A close-up picture of the sim's face, with the sim wearing a neutral face expression (like a mugshot) - not smiling, laughing, etc.
- For sims based on a person or character, a comparison picture of the real person, ideally similar to the close-up picture of your sim.
You may, of course, include other pictures like a full-body picture, posing pictures, whatever, to show off your sim how you like, but please make sure to include at least the above. Do not apply filters like sharpen, contrast, etc. to your pictures, as downloaders want to see what your sim will look like in their game, not your skills at using Photoshop.
Packaging Your Sim
Your sim must be "packaged" (placed correctly in a .sims2pack file) to upload to MTS.
Born in Game/CAS Sims
If you have created your sim in Create a Sim or if your sim was born in-game you will need to follow these instructions on how to extract your sim using SimPE, so they are accessible to you in Body Shop. Do that before you go any further, and then do the below instructions to actually package them.
Package Your Sim
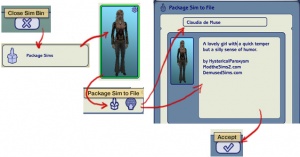
Step 1: Run Body Shop: Body Shop is a utility that comes with your game, used for creating and packaging sims (among other things). You already have Body Shop on your computer. To run Body Shop, click Start - Programs - EA Games - The Sims 2 (or the newest expansion you have installed) - The Sims 2 Body Shop. If you are having trouble with Body Shop not loading, crashing when loading, or other related issues, please see: Game Help:Body Shop
You'll get a message saying that your sim was saved to your desktop with the filename you gave it. That sims2pack file is the file you will upload when sharing your sim at MTS.
Credits for Included or Pictured Content
You are responsible for providing accurate descriptions, links, and credits for all pieces of custom content included with or pictured on your sim. This is to give credit to the creators for their hard work, and to make sure downloaders can get anything that isn't included by downloading it separately.
| Credits, Policies, and Removing Content |
|---|
|
You've got your sim packaged as a .sims2pack file, but now you need to take a look inside that .sims2pack file to see what is included. You will need to remove any content that the creator says you can't share. You will also need to collect credits and links for any content you have included in your screenshots. This is usually the most labor-intensive part of uploading sims, but if you ensure that the content you use on your sims is shareable and identifiable before you ever make the sims, it helps a lot. |
| Looking Inside the Sims2Pack |
|---|
|
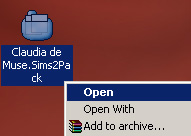
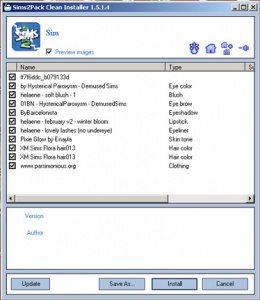
To see what's inside the sims2pack file, you'll need Clean Installer. Click here to go to the Clean Installer website, where you can download it for free. There is also a Quick Start Guide, FAQ, and Manual at the Clean Installer site to help you get started using it. Once you install Clean Installer, it should associate itself with .sims2pack files, so when you double-click on any one of them to open it, Clean Installer will come up and tell you what is inside. Go to your Desktop. You should find a new file there, with the same name that you gave your sim in Body Shop when packaging. It should have an icon like the one shown. Right-click on this file and choose Open.Clean Installer will open and you will see a list of the contents of the sims2pack file, including what tooltips are used. |
| Custom Content Links/Credits |
|---|
|
Now you need to:
You will be asked to provide this information in the MTS upload wizard. While the wizard does save links entered previously by other creators, some of those links may not be correct. It is your responsibility to make sure that all of the links for your upload are working and correct. Start a text file on your Desktop where you can type everything out as you locate the parts. This can be the hardest part, depending on how descriptive the original creators were in their tooltips and filenames. They are generally good clues, though. Generally it's good to start your text file by organizing it by item, so you know when you have a credit and link for each item, and then a section for any required meshes and the links to those. Then you can begin filling in each item as you find out where it came from. You can check the filename for a particular item by floating your cursor over it:
Use the tooltips and filenames to track down where you found the items originally to check the policies and provide credits and links, and in some cases, to see whether a mesh is needed. There are several ways to do this:
|
| When to Remove Content from the Sims2Pack |
|---|
|
Content That Cannot Be Redistributed: In checking the file for contents and locating all the parts, you may come across some pieces that cannot be redistributed. Creators have a right to say what can and can't be done with their custom content, and if they say you cannot upload it with full sims, please respect their wishes and remove that content. If you have a link for a file that the creator has asked that you not distribute, you can provide that link to downloaders and say that the item was not included - if they download it separately and install it along with your sim, it will properly show up on your sim. Content You Cannot Find: If you just cannot locate a link for a piece of content after searching and searching, or if the particular item cannot be redistributed, then REMOVE that content from the file, or repackage your sim using items you can track down/can share. Meshes: If you have the Pets expansion (or any later expansions), the version of Body Shop that comes with Pets and later expansions will also include meshes for any custom hair and clothing in the sims2pack file. Please do not include these meshes with your full sim upload unless:
Please do not include meshes that are uploaded on MTS, even if the creator says it's okay - this creates redundant uploads. Also do not include meshes that the creator says not to include, or if the creator doesn't say. If you get special permission to include a mesh that normally cannot be included (or the creator's policies don't say anything) please say in the text of your upload post that you have permission - we can't read your mind! If you do include the mesh, make sure you include a credit and link in the text of your post - and make sure you state that the mesh is included! |
| Removing Unwanted CC |
|---|
|
For instructions on how to remove unwanted content from a sims2pack, including content that cannot be redistributed and meshes, please see this mini-tutorial by Tiggerypum. The tutorial explains how to remove unwanted meshes if you have the Pets expansion, but the exact same method works for removing all content from a sims2pack file. |
Adult Content/Nudity
We do not allow adult content at MTS - please read the following to know what constitutes adult content.
| Adult Content/Nudity |
|---|
|
MTS2 is not an adult site. We do have an adult site affiliated with MTS2, Sexy Sims 2 where adult content may be uploaded. But because MTS2 is a PG-13 site, no adult content may be uploaded to MTS2 itself.
Items relating to illegal drugs do not belong on MTS2. You -may- post items relating to prescription and over-the-counter drugs, as well as alcohol and tobacco on MTS2, but items related to illegal drugs should go on our adult site. For more information and a further list of items we do not allow on MTS2, see: Uploads Not Allowed on MTS2. |
| Other Adult Content |
|---|
| Content with swear/curse words or sexually suggestive themes may not be uploaded to MTS. Please upload these items to the adult site instead.
Items relating to illegal drugs do not belong on MTS. You -may- post items relating to prescription and over-the-counter drugs, as well as alcohol and tobacco on MTS, but items related to illegal drugs should go on our adult site. "Nude clothing" uploads are not allowed on MTS, with the exception of male nude tops - that sort of thing needs to go on the adult site. For more information and a further list of items we do not allow on MTS, see: Uploads Not Allowed on MTS2. |
| Skintones |
|---|
| Skintones uploaded to MTS must be completely "barbie" below the waist. That is, you cannot include genitals or pubic hair for either gender. Skintones uploaded to MTS may include female nipples, or you may leave them off if you prefer, for a Maxis-like skintone that is completely "barbie."
You must obscure your skintones even if they are completely "barbie." Please see the section above under Screenshots, ("Obscured Skintones") for exact details on what you must obscure, and how to do so. |
| What Is NOT Adult Content |
|---|
| We do not consider transgender/crossdressing items to be adult unless they are too revealing (i.e. show the genitals or butt crack).
Sexy items such as skimpy lingerie, miniskirts, low-cut tops, nighties, corsets, bustiers, etc., are also not considered adult content unless they reveal the genitals, butt crack, or female nipples. |
Right Info/Right Files
All the fiddly bits - description, title, putting your file into a rar or zip, etc.
| Zip, Rar, or 7z |
|---|
| To upload your file(s) to MTS, you will need to compress them into an archive file, which makes them smaller and allows you to include many files in one download. The archive file formats we currently accept are .zip, .rar, and .7z.
For instructions on compressing your files into an archive, please see: Creator Guidelines: Creating Archive Files.
|
| Upload in sets |
|---|
| If you have created several items in a set, or similar items in the same sort of theme at the same time, please upload these together in a single set, all on one thread (instead of all separately, one by one, on different threads). This is easier for everyone: on our upload moderators, as they only have one thread to review rather than several... on you, as submitting a single thread is much quicker and easier than several... and on downloaders, as they can get everything they want all in one place rather than having to hunt around.
If you are doing a huge set, you can always break the set up into pieces, posting more screenshots along with the downloads as comments in the thread, as is done here and here. To do that, create a new thread in the Creator Issues Forum and arrange your thread there, using the first post as an introduction, and attach your uploads and images to subsequent posts in the thread. When you're done, PM a moderator to have it moved to the upload queue. For more information, read the message that displays when you go to post in Creator Issues. |
| Meshes Needed/Included |
|---|
|
Do you need a mesh? If you are recolouring a hair, clothing, or accessory, downloaders may need a custom mesh for your content to work right. If you don't know whether a custom mesh is required, it's very easy to check: cut and paste the contents of your Downloads folder somewhere else temporarily. Then put in only your creation, and load the game or Body Shop. If it shows up correctly, you don't need a custom mesh. If it doesn't show up correctly and shows a Maxis default instead, you do need a custom mesh, and you'll need to figure out what one it is. This can be tricky if you have a lot of meshes - best way is to make sure you know what mesh you're recolouring before you ever start! Including Meshes: If your creation does require a custom mesh, you may wish to include it in your upload so that downloaders can just get what you've uploaded and not have to go anywhere else. Once you've identified what mesh it is, you need to check back with the original creator on their site or forum and see what they say about that - look for a FAQ or policies page to see what they have to say about including their meshes. They may not want you to include their mesh, or they may only be okay with it if you include their readme file as well. Please do not include meshes that are uploaded on MTS, even if the creator says it's okay - this creates redundant uploads. Do not include meshes that the creator says not to include, or if the creator doesn't say. If you get special permission to include a mesh that normally cannot be included (or the creator's policies don't say anything) please say in the text of your upload post that you have permission - we can't read your mind! If you do include the mesh, make sure you include a credit and link in the text of your post - and make sure you state that the mesh is included! Also, please do not include the creator's "template recolour" file - you only need your recolour and the actual mesh itself. Linking to Meshes: If you cannot include a mesh, or the mesh is hosted on MTS, link to the mesh in the appropriate spot when uploading - when you mark your upload as a New Mesh Recolour you will get a screen asking you to link to the mesh. Please give as direct a link as possible - to the page where the mesh is, if you can. If you cannot give a direct link, or if there are a lot of meshes on the page, please give directions in the text of your post, as clear as possible... i.e. "Look under Female, Adult, Everyday, then go to Page 4, and download the black dress with the blue belt outfit - the mesh is included with it." Please do not hotlink the mesh - i.e. you want to link to the page it can be downloaded from, not the actual rar or zip file with the mesh in it - hotlinking is bad manners. |
| Expansion Packs or Stuff Packs required? |
|---|
| Particular items may be added with expansion or stuff packs, and depending on how your creation is made and the item you based it on, your creation may not work for users who do not own that expansion/stuff pack. You need to be sure of which packs are necessary for the items you have made. If users don't have the EP, your stuff may not work! If you are unsure of whether or not your creation will require an expansion or stuff pack, you can ask about it in the appropriate Create forum (under the Create menu on MTS) before uploading.
Make sure you only mark the EPs/SPs required that your upload actually needs! Don't just mark them all! For specifics, please read: MTS2:Creator_Guidelines/Compatibility |
| Where to Upload |
|---|
|
Please make sure you upload to the correct category. Click here to see what forums we have for offer:
|
Additional Stuff
- If your upload is rejected or marked as changes required and you're not sure why, ask in Creator Issues.


