Difference between revisions of "Sims 3:Creating A New Base Texture"
(→The End Result) |
(→Step 3) |
||
| Line 111: | Line 111: | ||
'''Note: Anything hidden by the alpha channel will not show up regardless.''' | '''Note: Anything hidden by the alpha channel will not show up regardless.''' | ||
| − | If you | + | If you insist on making a tattoo read this: |
* The areas that are black/dark grey in the alpha channel are where the highlights on the tattoo are located. | * The areas that are black/dark grey in the alpha channel are where the highlights on the tattoo are located. | ||
* On the alpha, the area where the tiger stripes are supposed to be are completely white. Then on the base texture itself, the tiger stripes are already inked in. | * On the alpha, the area where the tiger stripes are supposed to be are completely white. Then on the base texture itself, the tiger stripes are already inked in. | ||
Revision as of 00:33, 13 July 2009
Contents |
Base Textures
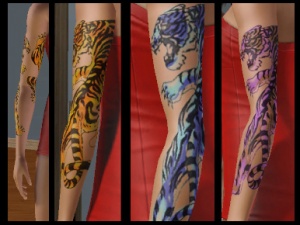
Base textures can be thought of as the "canvas" the game "paints" the patterns and colors onto. The game uses the Alpha layer of the base texture to determine what parts of the texture you want displayed. Altering the base texture can turn bland boring opera gloves into beautiful tattoos like these.
What This Tutorial Will Do
- Teach you how to alter the base textures of CAS parts in the Sims 3.
- Teach you how to add translucent effects to base textures.
What This Tutorial Will Not Do
- Make new meshes.
- Make new patterns.
-
 Take a look at HP's Custom Pattern Tutorial for that.
- Add multicolored masks
-
 Take a look at Hanlon Razor's tutorial for that.
Difficulty
This tutorial is written for beginners, however, some basic knowledge on how to use your imaging program is needed. Keep in mind that the more intricate and detailed you want your finished product to be, the more tweaking and practice you'll need. Although a tattoo was used as an example, it's advised to start simpler...consider that a warning.
What You'll Need
- Adobe Photoshop (purchase) or GIMP 2.0 (free)
- Delphy's CAS Texture Unitool
- DDS Plug-in for Photoshop or GIMP
The Tutorial
Part I: Extracting the Base Texture
Step 1
Open the CAS Texture Unitool (CTU).
Step 2
In the "Find A Mesh" tab, set the mesh details to the parameters of the mesh you wish to change the base texture of. (i.e. Adult-Female-Accessory) Next choose the mesh you want to use from the drop down list. For the purpose of this tutorial, the afAccessoryGlovesLong_fitted mesh will be used.
Step 3
Move over to the "Designs" tab and click "Add New Design".
Step 4
Under the "Other Details" sub-tab click the base texture key to highlight it.
Step 5
Being sure that the base texture key is highlighted, click on the "find" button at the bottom of the window.
Step 6
A DDS Preview window should pop up. Click the Export button at the bottom right corner of the preview window. Choose a destination for the file, give it a name, then save it.
Part II: Editing the Base Texture
Step 1
Open up the newly exported DDS file in your image editor. If asked, load default sizes and do not generate MIPmaps.
Note: If you get an image that looks like the one below, then you accidentally generated the MIPmaps. Close the file and reopen it, being sure to NOT GENERATE MIPMAPS!
Step 2
There are three methods to do this: the "subtractive" method, the "trace" method and the "cut-out" method. Note: The cut-out method only works for Photoshop users.
A Little Info
- Black areas in the Alpha are ignored by the game
- White areas are completely opaque in the game
- Grey areas between RGB values 151/151/151 - 149/149/149, give a translucent affect to the texture. 151/151/151 is the lightest (think highlights) whereas 149/149/149 is the darkest.
Subtractive Method
- Make sure your canvas background color is set to black
- Click on the channel view and hide all channels except the Alpha channel.
- Using the eraser, erase the major parts of the Alpha image that will not be a part of your new base texture.
- Use the paint brush to add details and shading using the colors mentioned above.
Trace Method
- Change your canvas background color to white
- Create a new layer on top of the base texture
- Design what you want your new base texture to look like. (Use the existing base texture as sort of a guide.)
- When you finish, switch over to the Channels view, and delete the existing Alpha channel.
- Create a new Alpha channel and make it visible.
- Pick one other color channel and make it visible as well.
- Erase the general area of where your base texture design is located
- Using the paintbrush, fill in any unwanted areas with black. (Note: although black might be selected, your paint might appear as a different color).
- Next, hide the other color channel, keeping the Alpha channel visible. Add details and shading using the grey scale colors mentioned above.
Cut-Out Method
- Create a new layer on top of the base texture
- In that new layer, design what you want your new base texture to look like. (Use the existing base texture as sort of a guide.
- When you finish, hold CTRL + Layer (click the layer with your new base texture design on it; if your design spans over multiple layers, merge them down into one layer. DO NOT MERGE IN THE ORIGINAL BASE TEXTURE) This should select your entire design.
- Switch over to the Channels view, and delete the existing Alpha channel.
- Create a new Alpha channel
- With the Alpha channel selected, hit ALT + Delete (this should make a basic cut-out of your new base texture design). If ALT + Delete doesn't work, try CTRL + Delete
- Using the eraser and the paintbrush, clean up the cutout and add details and shading using the colors mentioned above.
The End Result
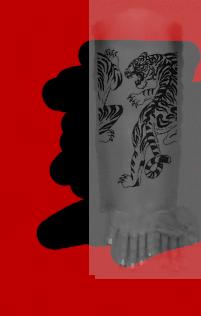
Depending on how complicated your new texture is, you might have to use a combination of the three methods. Regardless, your end result should more or less look like this:
Note: It does not have to be as intricate as this! Adding greyscale details and shading is totally optional. If you're a beginner you should just stick to a plain base texture for now, anyways! :)
Step 3
Make all channels visible and erase anything you don't want to show up on the base texture. When done, flatten the image.
Note: Anything hidden by the alpha channel will not show up regardless.
If you insist on making a tattoo read this:
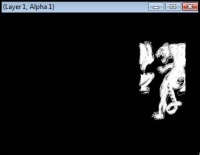
- The areas that are black/dark grey in the alpha channel are where the highlights on the tattoo are located.
- On the alpha, the area where the tiger stripes are supposed to be are completely white. Then on the base texture itself, the tiger stripes are already inked in.
- It may be hard to see, but there's a slight tint added to the base texture to give it more color definition.
- It's obvious that there's more to making tattoos than just a simple texture edit!
Tip: To get a feel for where the highlights/lowlights would go, try making the alpha channel plus one other color channel visible while editing. See the example below.
Part III: Saving the Base Texture
Step 1
Go to File → Save As. Pick D3D/DDS as your save format from the drop down list.
Make sure that the Alpha Channels box is ticked. Give the file a name, then click save. When you do the DDS plug-in box should come up.
Step 2
In the long drop box, pick DXT5 ARGB 8bpp | interpolated alpha, then press save.
GIMP Users: Pick the BC3/DXT5 format and tick Generate Mipmaps , then press okay.
Make sure the MIPmaps are generated.
And that's it!
Hints, Tips and Other Tidbits
- See Replacing the Base Texture to learn how to add your new base texture to a CAS Part.
- Some find it easier to use the Skin Specular texture in place of the Base Texture as guide.
- Just FYI, although tattoos were used as an example, it takes a lot of extra work to get them to color right. You'll need to learn how to create RBG masks.
- For more help, go to the MTS forum about this tutorial.
Special thanks to Robokity for letting me pick apart her fabulous tattoos


