Sims 3:Creating Custom Clothing Stencils
Contents |
Creating Custom Clothing Stencils for The Sims 3
A stencil is another way to customize clothing in The Sims 3. Unlike patterns, stencils do not tile and they are kept in the same spot on the clothing texture. Stencils allow for neat designs to be put on a clothing item, while still allowing the patterns to be customized underneath it.
What This Tutorial Will Do
Teach you how to make stencil overlays for the Sims 3 and link them to a mesh.
What This Tutorial Will Not Do
Make new textures, meshes or patterns for the Sims 3.
Difficulty
I've made this tutorial as newbie-friendly as possible. However, some basic knowledge on how to use your imaging program is needed.
What you'll need
- Adobe Photoshop (purchase)or GIMP (free)
- Delphy's CAS Texture Unitool
- DDS Plug-in for Photoshop or GIMP
(I'll be using Photoshop 7.0, so if you're using GIMP the screen shots will be different but the concept is the same.)
Part I: Preliminary Work
Step 1
Open the CAS Texture Unitool (CTU). Go to File → New
Step 2
Choose the age, gender, and type of mesh you want to use. Then in then drop down mesh list, pick the mesh you want to use. For the sake of this tutorial, we'll be using “Shirt Tee_Crew” found under Adult-Female-Top.
Step 3
Next we need to extract all the textures linked to that mesh group. So click on “Extract Textures”, then choose a destination for the textures to be saved.
Step 4
Now we can close CTU for now. But first, let's go ahead and save our new .package. Click File → Save As. Give your project a name, I'm naming mine "tutorial" but you can call it whatever you want.
Step 5
Usually you'd want to do this step first but we're doing it now! Find an image that you want to use as your stencil. I'm going to use this smiley face:

Part II: Creating the Stencil Image
Step 1
Open up Photoshop (or GIMP) and make a new canvas. Set the canvas size to 1024 pixels wide and 1024 pixels high. Make sure that you're in RGB mode. And set the canvas content color to white. (If you're using GIMP you'll have to expand the “Advance Options” tree to get to the mode and canvas color).
Step 2
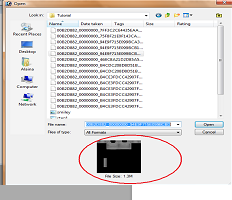
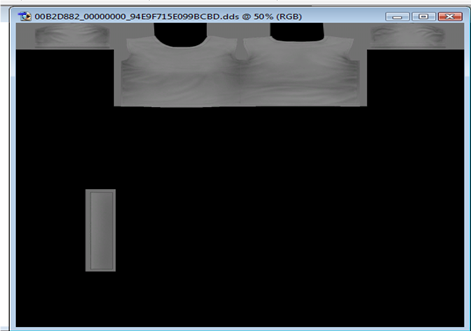
Next we want to open the base texture for the mesh that we're using. This is where all those extracted files come in at. Now this is tricky so we'll use the image preview to find what we're looking for. (Note: Make sure your DDS plug-in is installed). Find the DDS that looks like the one pictured to your right. For the sake of time, the one that you'll need to use is “00B2D882_00000000_94E9F715E099BCBD”. However that's only assuming you are using the same mesh I suggested in the tutorial.
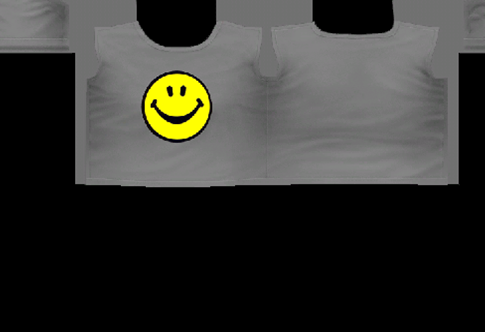
When you open the file you'll get a message asking what size to load the files in. Make sure that “Default” is chosen then click “Okay”. (If you're using GIMP, the dialogue should be more or less the same). You should end up with something that looks like this:
Step 3
Open up your stencil image in another window. Find the layer tool box and make a duplicate of the background layer. You can name the new layer if you want, but it's not that important.
Step 4
Hide the main background layer (the one we made a duplicate of), then using the Magic Wand select all of the unnecessary background colors in the image and delete them. In my case I'll select all of the white area around the smiley face. You may have to use the Eraser Tool to get some of the finer spots or you can adjust the tolerance on the magic wand.
When you have your image nice and clean, delete the old background layer.
Step 5
Using the Marquee Tool, draw a box around the meat of your image (or right-click and choose select all). Then, make a copy. Technically once you copy your stencil image you can close the file, but I like to keep all files that I'm working with open just in case. However, it's a good idea to go ahead and save your stencil image just in case you need it again.
Part III: Working Around the Mesh
Step 1
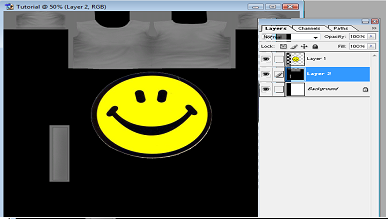
Copy and paste the stencil image into the blank canvas we created a few moments ago. Next go to the window with the shirt mesh texture and copy and paste it into the blank canvas as well. Arrange the layers so that the mesh texture is under the stencil image.
Step 2
We're going to use the shirt mesh texture as a guide so make sure that it fills up the entire canvas (which it should by default) and do NOT move it (in fact, it's a good idea to go ahead and lock this layer for now).
Judging by the shirt guide, you can see that (1) the stencil image is too big for the shirt mesh and (2) we need to do some more clean up on the stencil image.First let's erase some of the white left over at the bottom of the smiley face, then we'll resize it to fit on the shirt.
Once you have your image sized to your liking, place the image on the shirt texture guide. (Remember, the left half of the texture is the front of the shirt whereas the right is the back). I want my smiley face smack-dab in the middle but you can choose to place your stencil anywhere you want.
Step 3
When you have your stencil placed, hide the shirt texture layer and the background layer. Next flatten the image. If asked to discard hidden layers click “Okay”.
Part IV: Creating the Alpha Channel
When dealing with TS3 files, everything revolves around the four color channels: red, blue, green and alpha. Red, blue and green are created automatically but the Alpha channel is the one we have to create manually. There are many ways to create the Alpha channel so if you know an easier route than the one that I'm using, feel free to do it your way.
But for those of you who don't know how:
Step 1
Just like we did when creating our stencil, duplicate the background layer then hide it. Next use the Magic Wand tool to erase all of the extra unneeded space around the stencil. You don't have to be as meticulous this time, but if your stencil has letters be sure to clean out between the O's, E's, etc.
Note: Make sure you don't accidentally move the stencil image, It's placement is still very important!
Step 2
Next we're going to adjust the Hue/Saturation of the image (This should be under Image → Adjustments)
When you get to the Hue/Saturation adjuster, slide the Lightness adjuster all the way to +100.
This should turn your image pure white.
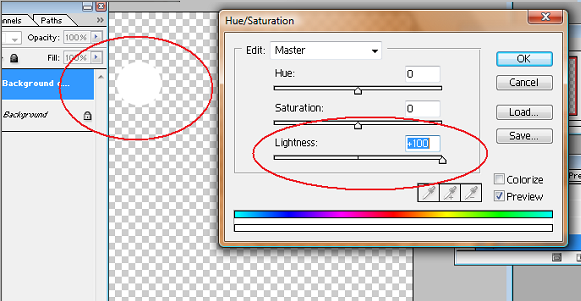
When done click okay.
Step 3
Using the Marquee tool, draw a box around the now-white image and make a copy.
Step 4
Click on the Channels tab. There should already be 4 channels already set up: RBG, Red, Blue and Green. Create a new channel (it should automatically be called Alpha 1). The image should turn completely black. Next paste the image we just copied anywhere in the black.
Step 5
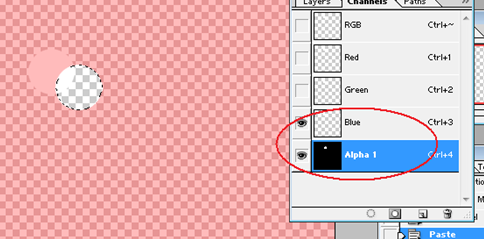
Next comes the tedious part: aligning the channels. Select the Blue Channel and make it visible. If it was already visible, make the red and green channels hidden and only have the Alpha and blue channel showing. You should get a pink tint added to the image.
Step 6
You can clearly see that the Alpha channel is misaligned. So, with the Alpha channel selected, move it around so that it's aligned with the blue channel. (Using the arrow keys can help you be more exact).
Step 7
Turn on all color channels to verify that everything is aligned correctly. When done, go back to the Layer view and delete the duplicate background layer (the one we turned white). You should get your original stencil image back. Next go back to Channel view and make sure the Alpha channel is visible. If it is, you should get that pink hue again.
Congratulations! You've passed the hardest part!
Now's a good saving point.
Part V: Linking the Stencil to the Mesh
Like patterns, the stencils have to be saved in DDS format in order to be read by the game.
Step 1
Go to File → Save As. Pick D3D/DDS as your save format from the drop down list.
Make sure that the Alpha Channels box is ticked. Give the file a name, then click save. When you do the DDS plug-in box should come up.
Step 2
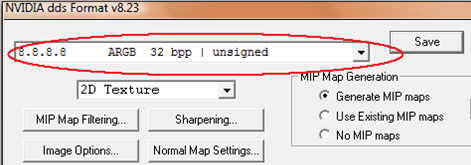
In the long drop box, choose 8.8.8.8 ARGB 32 bpp | unsigned, then press save.
Step 3
Close all Photoshop (or GIMP) windows, being sure to save all your work. Next open up CTU and go to File → Open and chose the .package file we made a while back. If CTU gives you grief about not being able to add new designs, simply close the program and open it again. If you get the same message again then just create a new file with the same age/gender/type/mesh. It won't make a big difference.
Step 4
Click on Add New Design. Make sure the Stencils tab is selected then tick the Enable Stencil A box.
Step 5
Click the Replace button, then find the DDS file we just created. Hit okay, then click the Find button to verify that it's the right image.
You should get the stencil DDS we just created. At the bottom tick the Alpha box just to verify (the image should turn white-ish).
Step 6
Hit the Commit button, then save your .package.
Step7
Install your .package into your game and check out your work.
Don't party just yet! Sometimes things look a lot different in the game, so don't be surprised if you have to do some additional editing.
Notes
- If you want to make a set of that particular mesh (i.e. the side scrolly-boxes in CAS) then add multiple designs to the package (repeat step 4 and 5).
- If you still need help, then go to the MTS forum thread about this tutorial.
- If you want the original PDF file with more detailed screenshots and steps, refer to this thread also.
--Daluved1 21:48, 23 June 2009 (CDT)

